HOW TO INSTALL KALI LINUX
In this blog, I will show you how to install kali Linux. We will start by understanding Linux. So Linux in a nutshell is basically a family of open-source Unix-like operating systems based on the Linux-Kernel and it was developed by Linus Torvalds in the early 1990s.
There are many devices that use the Linux kernel including the android smartphones that most of us use. Linux being open-source means one can see the source code ( unlike others, you can not see their source code) and manipulate it to your own liking. This means having the source code you can add things and remove what is unnecessary according to how you want the operating system to be like.
So what you will need for the installation of Kali Linux is;
- Minimum of 4Gb flash drive
- Stable internet connection
- The machine you want to install is kali Linux.

After the download is done, download balena etcher which will be used to flash the Kali Linux iso to the flash drive.

After the download is id done, install the balena etcher in your windows machine and launch it. Insert your flash drive, while in the balena etcher select the Kali Linux iso file as shown below.

Power on your computer but first make sure you have inserted the flash drive. Now go to your bios setting and select boot from the USB flash drive and now a screen like the one below will appear.


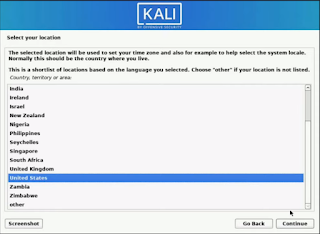
Click on the graphical install and the install process will be initiated. You'll be prompted to select language and location as shown below:

Now it'll start doing detections of the necessary stuff and if you are not connected to a network you'll be prompted to connect to a network and you'll select your network and enter the password then you'll proceed to set the hostname. You can just type any name that you want here or leave it the way it is.

You'll be prompted to add a domain but if you don't have one you leave it blank and proceed.

Now you'll be asked to type the full username, username for your account, and password. You can change the full username or just leave it as kali. NOTE: The username for your account should be in lowercase letters and you should not forget it since you'll be asked to enter it while logging into Kali Linux.


More things will continue to be set up and you'll just be patient as you watch. You'll be prompt to configure the clock.

You'll be prompt to select how Kali Linux will be installed in the disk.


Now the Kali Linux base system will be installed and the drive partitioned. Now you'll be prompt to select the software that you'll need for your Kali Linux.

Now the selected software will be installed. The installation might take a while depending on your internet speed. Now you'll be prompted to accept the installation of grub to the hard disk.


Wait now as the installation finalizes. And you'll be prompt to boot into the Kali Linux.

Now your system will boot with Kali Linux up and running.

Now login with the username and password you created.
Hope this article was helpful. Happy hacking !!


Comments
Post a Comment